Ever try to format your comp on your own? Now i'll teach you how to format your own computer. Most of us has experienced such of viruses attack or total damage in your system. Save your money by learning this useful knowledge.
Before you start :
Note that by following this instruction, you will wipe out your data in your hardisk [HDD]; In this how2.0 my example is : Volume C is your system path HDD
Prepare certain of things before you start :
- Windows XP installation CD
- Driver installer for your computer (in CD/DVD or flash drive)
- Backup ur data first because in this tutorial i will use full clean format method
Its now how we begin :
1. Setting up your BIOS [Basic Input/Output System]
What is this? By its simple meanings, BIOS act as your computer brain. It was installed in your comp MotherBoard [MoBo] in the ROM chip [read only memory]. simply by knowing this, you will know that BIOS is so important in computer system.Depending on your comp MoBo, the shortcut key to enter BIOS is various. You can know the shortcut key at the main screen when the comp boot [ex: F2, DEL]. Once you logged in the BIOS mode, chech for a setting related to BOOT ORDER. Then, you must set up your CD/DVD drive as the 1ST BOOT SEQUENCE. Save your setting, then exit.
2. Booting from the CD
Put the Win XP installation CD into the CD/DVD tray and start up your comp. After bypassing the main screen the screen will appear a blank black screen with a line of text:
Press any key to boot from CD....
So, hit ant key on your keyboard as soon as posibble. The CD will now loaded in a short while [depending on your comp system].
3. Windows XP installation Setup
3.1 Loading installation
Once fully loaded, a blue screen like this will appear;
Hit "Enter"
Then a screen with a licence agreement from Microsoft will appear. Just Hit "F8" to agree
3.2 Partitioning
A blue screen of partition selection will appear.
You'll see a listing of partitions on your computer. If all you see is the line Unpartitioned space, with no drive letters (such as C:), you may skip to the next step. Otherwise, for each partition listed, you must highlight it and delete it. Use the arrow keys to highlight a drive letter [ex : C:, D:, E:, and so on]
Once you've highlighted a partition, press the "D" key.
The installer reminds you that there is already data on this parition
Hit "enter" to continue.
The installer then asks you to confirm that you really want to delete this partition.
Hit "L" to confirm.
[ATTENTION : All data on this partition will be erased after this step], so make sure you've backed up all important files. Repeat this procedure until there are no partitions remaining (the menu should only show a line that says Unpartitioned space.
4. Initializing and Formatting the Disk
You should now have a blue screen that has 1 choice. The Unpartitioned Space line on the partition menu:
Hit "enter" to use this entire drive for Windows XP.
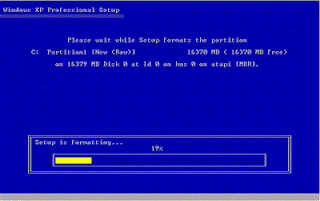
Then, it will ask you how you want to format the drive. You should the NTFS filesystem. If the computer is brand new, you may use the "Quick" version of the format. For older computers, or if you're unsure, you should use the regular formatting to ensure that the drive has no errors
Select your formatting choice and hit enter.
The computer will now format the drive in your computer. Depending on the HDD size, the speed of your comp, and whether you select for the "quick" format. A quick format will finish in just a couple minutes but a normal format can take several minutes to finish.
5. Copying Installation Files
Once the drive is initiallized, the installer will automatically begin copying files from the CD onto your comp HDD. Again, depending on the speed of your comp and CD-ROM drive, this can take several minutes.
When the files has been copied, the comp will auto restart .Make sure that you leave the Win XP Installaton CD inside the CD/DVD tray. You should take care NOT TO BOOT FROM THE CD [do not press a key when the computer prompts you]. Just let the computer start up off the hard drive.
6. Windows XP Installation

The computer will start up Windows XP, and will start the second phase of installation. For the most part of this installation, you can simply sit back and let the installation complete by its own [lalalala..]. I describe below, the parts that require an action by you.
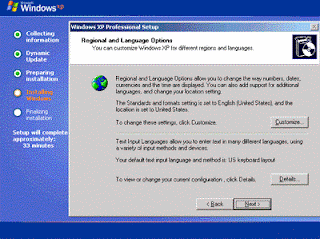
6.1 Regional and Language Options
Simply just hit "next"
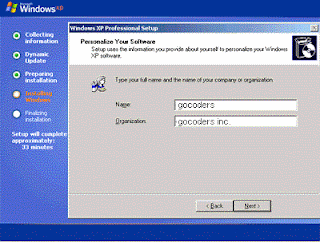
6.2 Personalize Your Windows
Fill in the name of the person who will be using this computer.
6.3 Product Activation Key

Here you must enter the 25-character product key for Windows XP. The key can be found in the software database, or on the installation media.
6.4 Computer Name and Administrator Password
For the computer name, you should enter a DNS hostname that describes your machine.Do not use spaces, underscores, or other punctuation in the name. Only use numbers, leters, and dashes for the name. For the Administrator password, you can set it up as what you want. I preffer to leave it blank first and set it up later.
6.5 Date and Time Settings
The Automatically adjust clock for daylight saving changes checkbox should be selected.
Set the proper date and time
6.6 Networking Settings
I will assume that your comp is not in the network.
Leave the Typical Settings radio button selected and click the Next button to proceed
6.6 Workgroup or Computer Domain
On this screen, select the radio button as example. By default, it will automatically named your workgroup as "workgroup"
6.7 Finishing Installation
After above steps , the installation will finish and then it will auto restart. You can now take out your Win XP Installation CD from the CD/DVD tray.
7. Logon Windows and Finishing Setup.
7.1 Windows logon
7.2 Resolution Setting
Once Windows has loaded it will adjust your monitors resolution. Just click "OK" to continue
If you are satisfy with the resolution change press "OK" again.
7.3 Microsoft WinXP Welcome Screen
Just press "next" to continue
7.4 Firewall Setting
If you are using a copy of Windows XP with Service Pack 2 or later, its already integrated the next screen that will ask you to enable the Windows Firewall. I would suggest you to select "not right now".
Then click "next"
7.5 Activating Windows XP
The next screen asks you to Activate your copy of Windows XP.
You have 30 days in which to activate your copy of Windows so I always select the "No" option and then activate when I am satisfied everything is working correctly.
7.6 Connection To The Internet
After the Activation screen Windows XP asks you How you will connect to the Internet. This and the following screen may only appear if you are using a DSL or Cable modem.
Although personally I prefer to set-up the Internet Connection after Windows XP has finally been installed
7.7 Internet Connectivity
After making your connection selection Windows check for Internet Connectivity.
Just press "skip" to ignore this step
7.8 Users
You are now asked Who will use this computer. Insert the name(s) of the user(s) who will be using the computer and then press Next.
After completing the "who will use this computer" section a "thank you screen" will appear
7.9 Finishing
After a while the Welcome Screen will appear
Finally, its the glorious moment ever for you [LoL!] You're now successfully installing Win XP by your own. So, don't forget to install all of your driver to make sure all of your hardware working in a proper condition. If you want this how2.o, simply click download link below.
[3MB]


0 comments:
Post a Comment